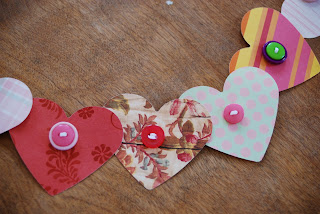
Paper heart button garland

This may seem like a hard craft to do but I think most craft loving folks have this stuff laying around and it can be made quickly if you have a block of time. Once upon a time I was in to scrapbooking. Now I'm not. I still have loads of papers and other little things that one day perhaps will be used again. Until then I figure why not use all that fab paper to make some pretty little hearts. I picked out mostly pink, red, white and orange papers. I think that if you have a group of colors in similar spectrum this can turn out quite well. Blues and purples would be a nice change, can't you just picture that contrast? There are many possibilities.
Supplies:
heart shaped paper punch
assorted scrapbook/decorative papers in your choice of colors
3mm ribbon in the color of your choice
chenille sewing needle
assorted 2 hole buttons in complimentary colors to the paper used
x-acto knife
cutting mat
There are several things that will save time and help you along in this project. One is a decent heart paper punch. I bought my punch at a local craft store about 3 years ago it has paid itself off for sure. Like all projects I work in chunks of time. I began by finding the papers and punching out hearts. This is a great mindless activity and was awesome to do while the kiddos were working on homework. It kept me busy and if I had to stop it was no big deal. After all the hearts were punched out I put them in a little shoe box and set them aside. There is no magic number of hearts, however many you need to make the length you want. I punched out hearts until all my paper was used. I think roughly I punched out about a 100 hearts. There is no way I used that many. However having 2 little girls around does mean that at least half will mysteriously disappear and end up in their projects.
My next phase was to get some buttons. Thankfully my buttons are organized in fishing tackle boxes so all I needed to do was dig those boxes out of my sideboard. Finding ribbon was trickier. That is one thing I have yet to put all in one place. I have ribbon spools all over. Some are in a ribbon organizer and then there are several drawers of my sideboard with spools hiding in them. I used 3mm (1/8 inch) white grosgrain ribbon. You can use any color but the 3mm size was perfect to fit through my needle and the button holes.
Begin the garland by using the x-acto knife to cut 2 vertical slits near the top center of all the paper hearts. Make sure your table is protected with a cutting mat or something that can withstand an x-acto knife. I spaced the slits about 6mm apart. I eyeballed it. When all the hearts have been prepped then you can begin to make the garland. Cutting the end of your ribbon at an angle will allow it to fit through the needle eye easier. Thread your needle with the ribbon. Select a heart and coming from the back of the heart put your needle through the right hand side slit. Choose a button and slide it through the needle until it reaches the heart top. Push the needle through the other side of the button and then pull the ribbon all the way taut, making sure the ribbon lays flat on the button top. Next push the needle through the left hand slit and carefully pull until taut. Gently adjust the ribbon until the button lays flat on the heart. The buttons will act as a stopper preventing the hearts from sliding along the ribbon. You will need to slide the first heart all the way to the end of the ribbon before adding the button. The only thing that you'll need to be careful about is the ribbon twisting while you are adding more hearts. You want the ribbon to be flat so that your garland will turn out flat. I suggest using a sturdy paper because if you are not careful you can rip the heart and that would be terrible. Scrapbooking paper seems to be best since it is has a decent weight. Although cardstock could work well. Continue adding hearts and buttons until the garland it reaches your desired length.


Comments